
Polycom’s VVX series was a business phone staple for over a decade, but the line has stalled — most models are now end-of-life or approaching end-of-support, with firmware development largely abandoned following a series of rebrands and acquisitions.
If you’re deploying new phones, we recommend Yealink or Grandstream instead — both are actively developed, competitively priced, and fully compatible with SIPcity. Or skip the hardware entirely: our iOS and Android apps deliver the same calling features at no hardware cost.
If you’re sticking with Poly, SIPcity supports VVX handsets through device provisioning and the guides below cover everything you need.
Configuring the handsets
Option A: Device Provisioning
Our Device Provisioning pushes an optimised configuration template to your handset and registers it to a number on your account. It’s the fastest way to deploy a VVX phone and keeps settings consistent across restarts.
Because Polycom doesn’t support zero-touch provisioning, you’ll need physical access to each phone to enter the provisioning address and retrieve the MAC address before the process can complete remotely.
Device Provisioning does not support Polycom IP SoundPoint phones with firmware 3.3 or older. Upgrade to at least version 4.1.1 first — see Upgrade Firmware for instructions.
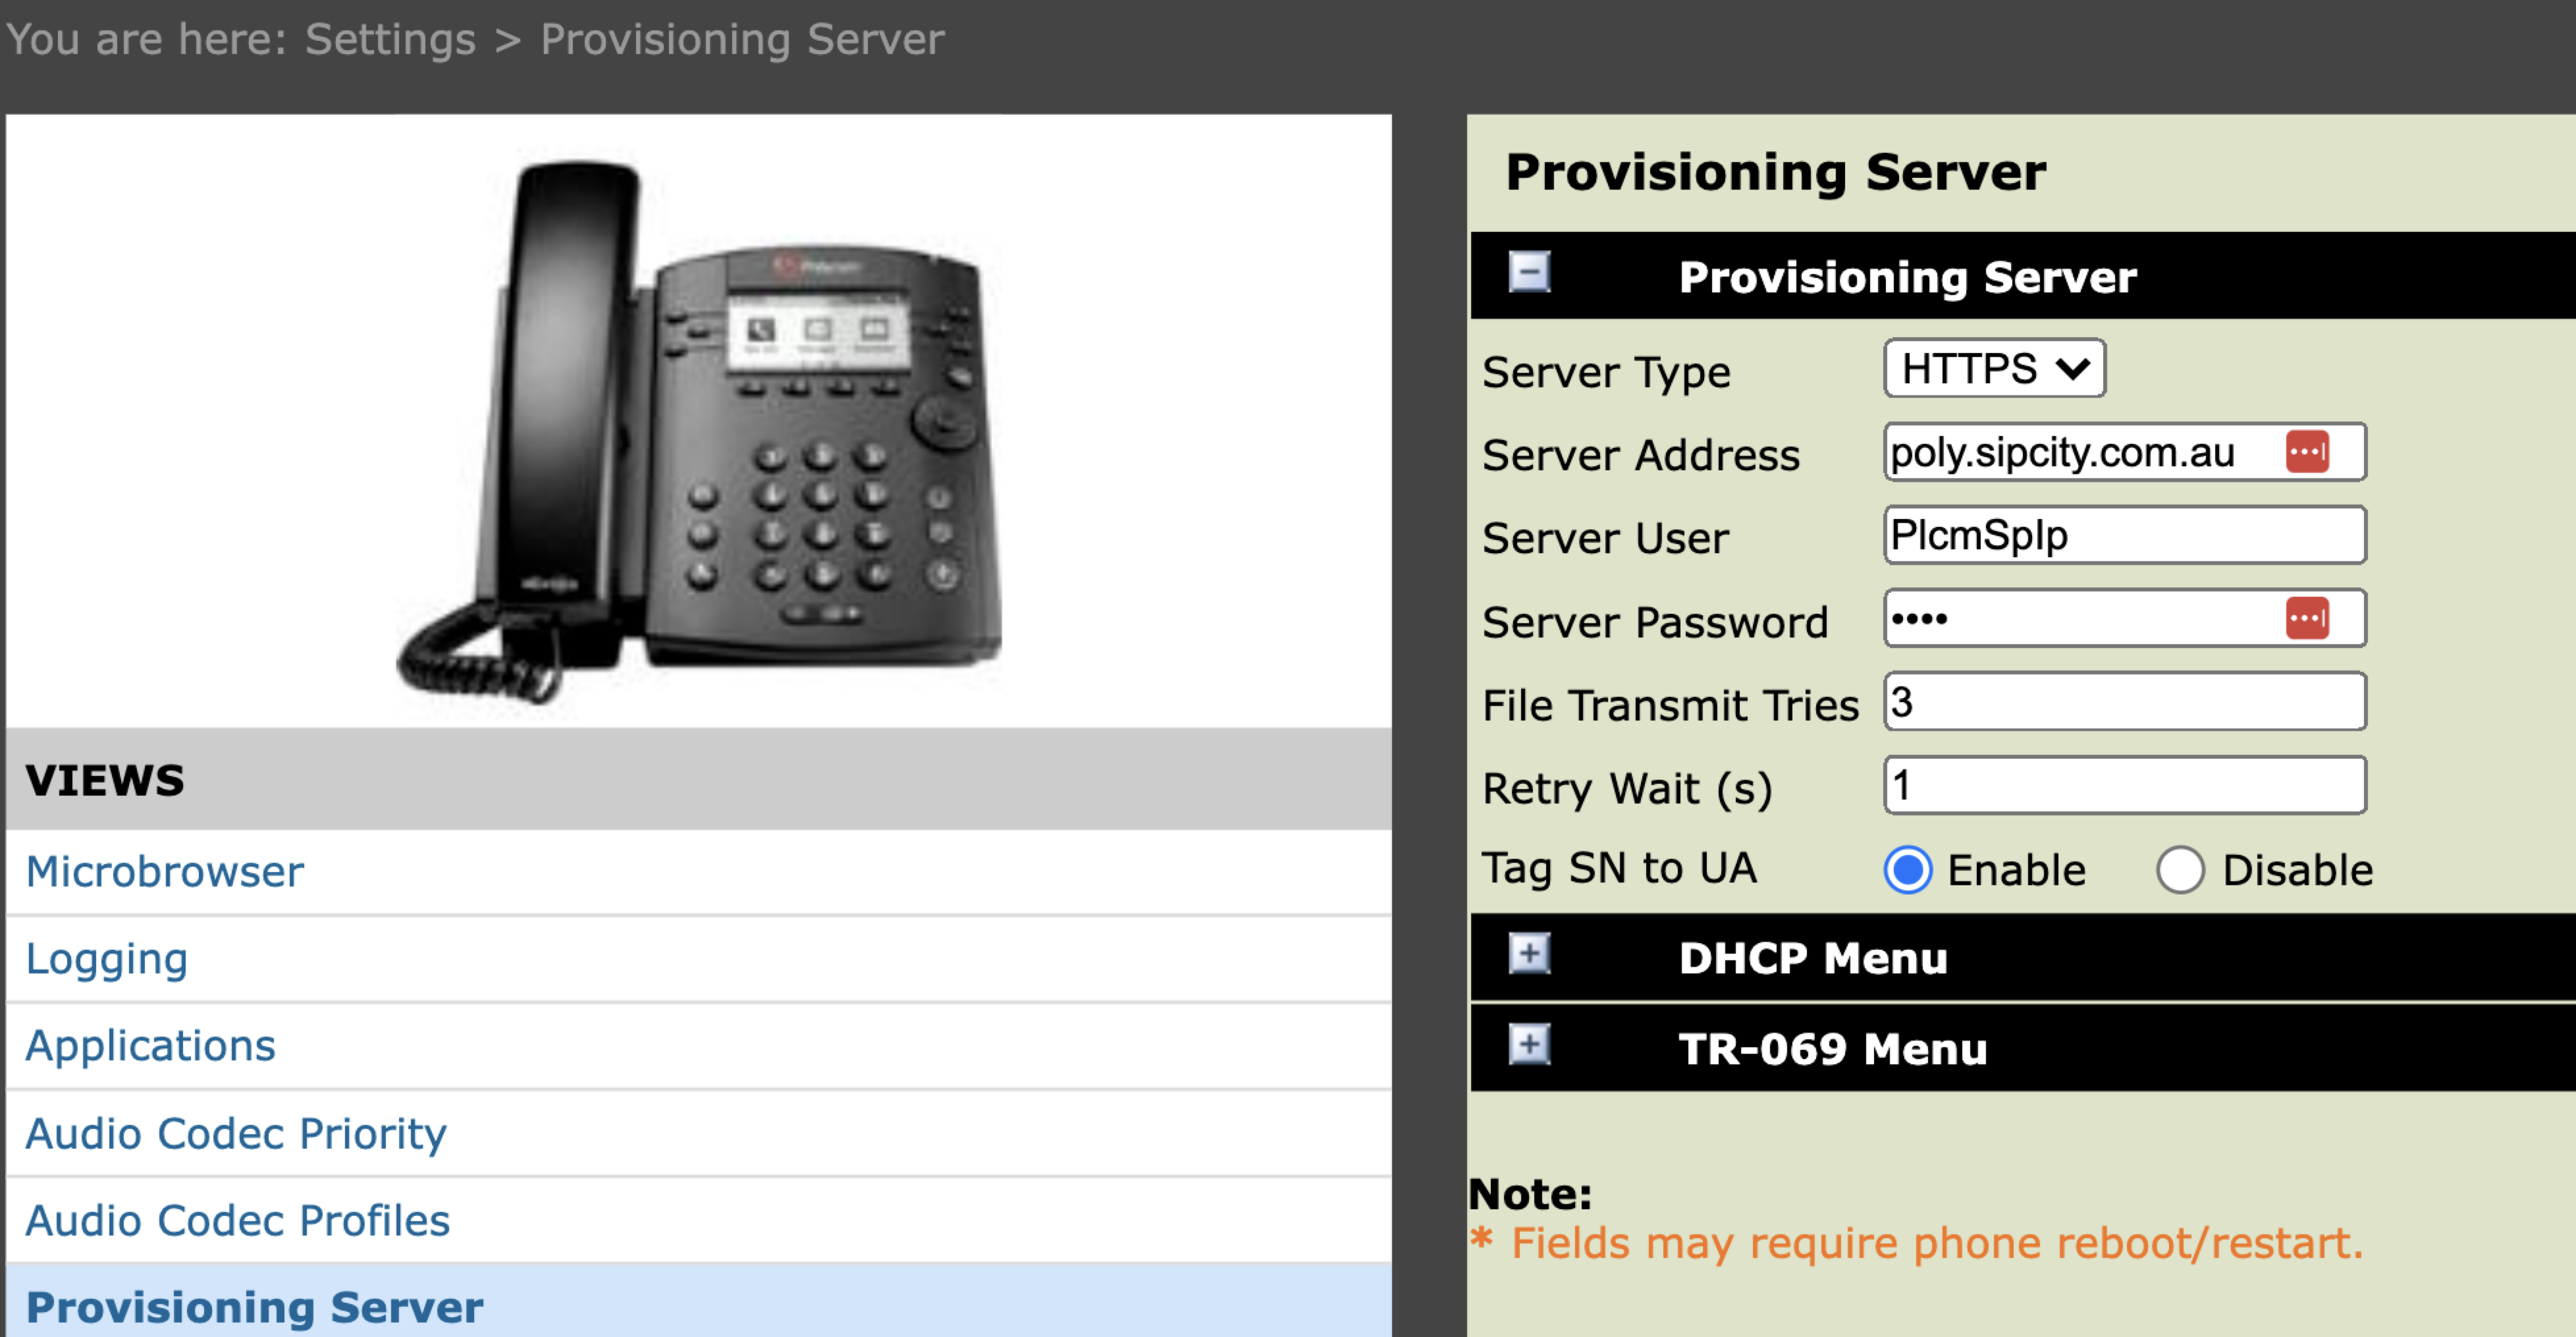
Step 1: Configure the Provisioning Server
- Find the phone’s IP address: press Home > Settings > Status > Network > TCP/IP Parameters > IP and note the address shown (e.g. 192.168.1.25).
- Enter that IP address in your browser to open the phone’s web interface.
- Go to Settings > Provisioning Server.
- Set the following fields as shown in the screenshot:
- Server Type — HTTPS
- Server Address — poly.sipcity.com.au
- Server User — PlcmSplp
- Click Save.
Step 2: Get the MAC Address
The MAC address is the phone’s unique identifier — you’ll need it to link the handset to a number in your account.
- Press Home.
- Note or copy the MAC address displayed on screen.
Step 3: Register the Phone to a Number
- Log in to your SIPcity account.
- Go to Tools > Device Provisioning.
- Select Add Device.
- Paste the MAC address into the MAC address field.
- Select a DID from the line number list. You can assign up to five separate lines.
- Leave TLS as the default transport. Select UDP only if your environment requires no encryption.
- Select Add.
- Restart the phone to pull the configuration.
Option B: Manual Configuration
Use this method if you are able to use Device Provisioning. You need four things to complete the setup: your display name, your full DID, your SIPcity account password, and the SIPcity server address.
Get the phone’s IP address
- Press Home > Settings > Status > Network > TCP/IP and note the IP address shown (e.g. 192.168.1.11).
- Enter that IP address in your browser to open the phone’s web interface.
- Go to Settings > Lines and select a line.
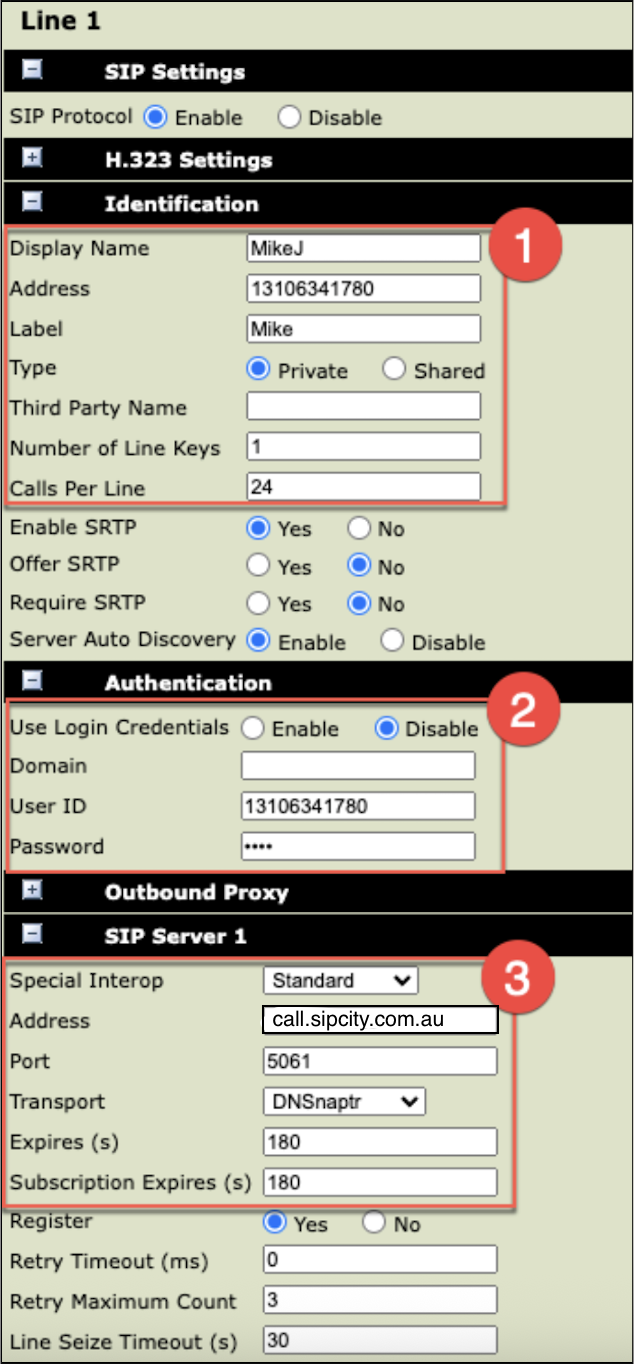
Configure the line
Enter the settings as labelled in the screenshot:
① Identification
- Display Name — your name
- Address — your full DID
- Label — usually the same as Display Name
② Authentication
- User ID — your full DID
- Password — your SIPcity account password (find this in your Switchboard)
③ SIP Server 1
- Address — call.sipcity.com.au
- Port — 5061
- Transport — DNSnaptr
- Expires — 180
Other Features
Presence and BLF
Presence or Busy Lamp Field (BLF) shows the availability status of extensions on your account as an LED indicator on your IP phone.
BLF operates via the SIP protocol by sending your phone status messages about other monitored extensions. When any monitored extension changes from idle to busy (or vice versa), our Cloud PBX notifies all subscribed phones via SIP NOTIFY messages, acknowledged with a 200 OK response.
We automatically enable Presence and BLF on our network.
Setting up BLF on a Polycom phone
Go to Settings > Directories > Contacts Directory.
Select Add (+) and enter the contact details: name, surname (optional), and the full phone number including country and area code.
Set Protocol to SIP (for VVX500 and VVX600 only).
Set Watch Buddy to Enable.
Select Save.
Select the contact, then select Add to favourites to display it on your phone’s home screen.
Extension dialling
Give favourite contacts a line extension to simplify dialling (e.g. reduce 1-310-707-504 to 504). This allows coworkers to reach you using a short three or four-digit number.
Enable BLF (Busy Lamp Field) on the handset
BLF/Presence support is automatic, but you must separately enable handset presence for manually configured Polycom phones.
- Get the phone’s IP address: Settings > Status > Network > TCP/IP.
- Enter the IP address in your browser.
- Log in to the phone (username and password).
- Go to Preferences > Presence > Enable.
Enable Buddy on the handset
- Go to Settings > Directories > Contacts Directory > Add (+).
- Enter the contact’s first name, last name (optional), and full number including country/area code.
- Protocol: Select SIP (VVX500, 600 only).
- Set Watch Buddy to Enable.
- Click Save.
- Select the contact and choose Add to favourites (if you want it on your home screen).
Handset volume
Polycom handset volume is typically low and resets to factory defaults, even after manual adjustment. If you’re using our Polycom provisioning, we disable the reset function to maintain your volume settings.
Connect a Bluetooth Headset (VVX 600 only)
Only the Polycom VVX 600 natively supports Bluetooth. To pair a headset:
- Enable Handsfree Mode: Menu > Settings > Advanced (password 456) > Administrative Settings > Handsfree Settings > Handsfree Mode > Enable
- Enable Bluetooth: Menu > Settings > Basic Settings > Bluetooth Settings > Radio ON
- Put your headset into pairing mode
- Press the Bluetooth symbol on the phone to open Bluetooth Settings
- Select Manage BT Headset > Scan, then select your headset from the list
Access Voicemail
On a provisioned Polycom handset, press the Messages button to open your voicemail box.
| Key | Action |
|---|---|
| 1 | Access new messages |
| ◀ | Previous message |
| ▶ | Next message |
| Delete | Delete message |
| Forward | Forward message |
| Save | Save message |
Firmware upgrade
Older Polycom phones (firmware 3.3.xx or earlier) don’t support web-based auto-provisioning. You may need a two-step firmware upgrade to reach minimum version 4.1.1.
- Log in to the phone’s web browser.
- Enter the standard password: 456.
- Go to Utilities > Software Upgrade.
- Click Check for Updates.
- Select the latest update from the list.
- Click Install.