Automatically provision Yealink phones to connect them to SIPcity quickly.
Last updated
1. Yealink Device Provisioning
Register your Yealink phone in Device Provisioning to get it up and running in minutes with automatic configuration. Yealink phones use ZeroTouch provisioning, connecting to SIPcity’s Device Provisioning system to download assigned phone numbers and features automatically.
1.1 Provision a Single Phone
To access Device Provisioning:
Log in to your account.
Click Tools > Device Provisioning.
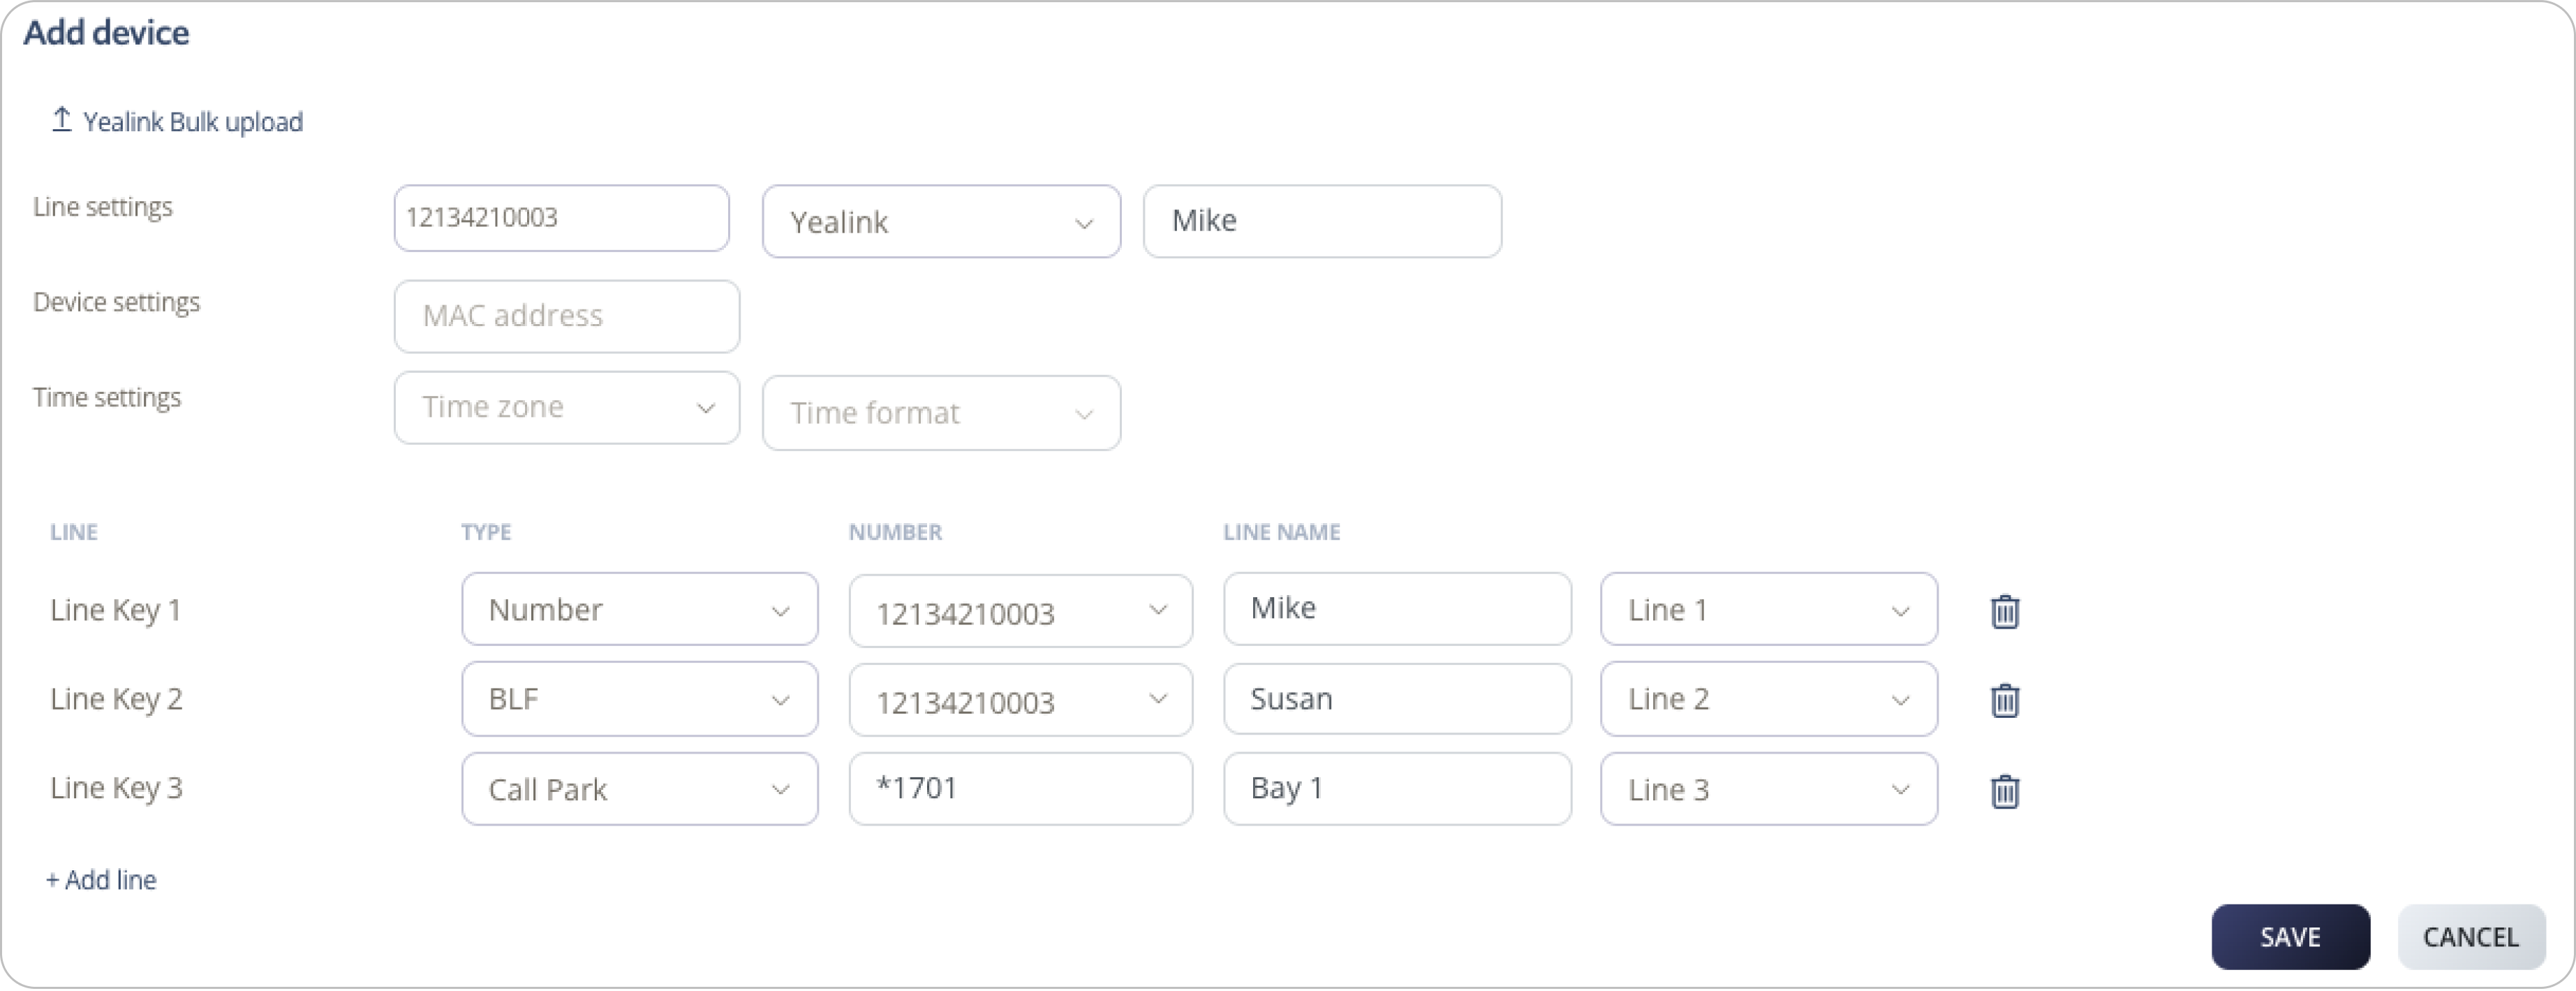
Select Add Device | (Yealink).
Configure Line Settings: select the phone number, select Yealink, and enter a device name.
Enter the MAC address of the phone.
Select your Time Zone and Time Format.
Under Line Key 2, select the phone number or feature to assign.
Click Save and manually restart the phone.
Once provisioned, any changes made in the portal automatically restart the phone to apply updates.
1.2 Configure Call Parking Keys
Call parking lets you place a call on hold into a shared parking slot so it can be retrieved from any phone on your account. You can add as many parking slots as needed by assigning additional line keys.
In Device Provisioning, select the phone you want to configure.
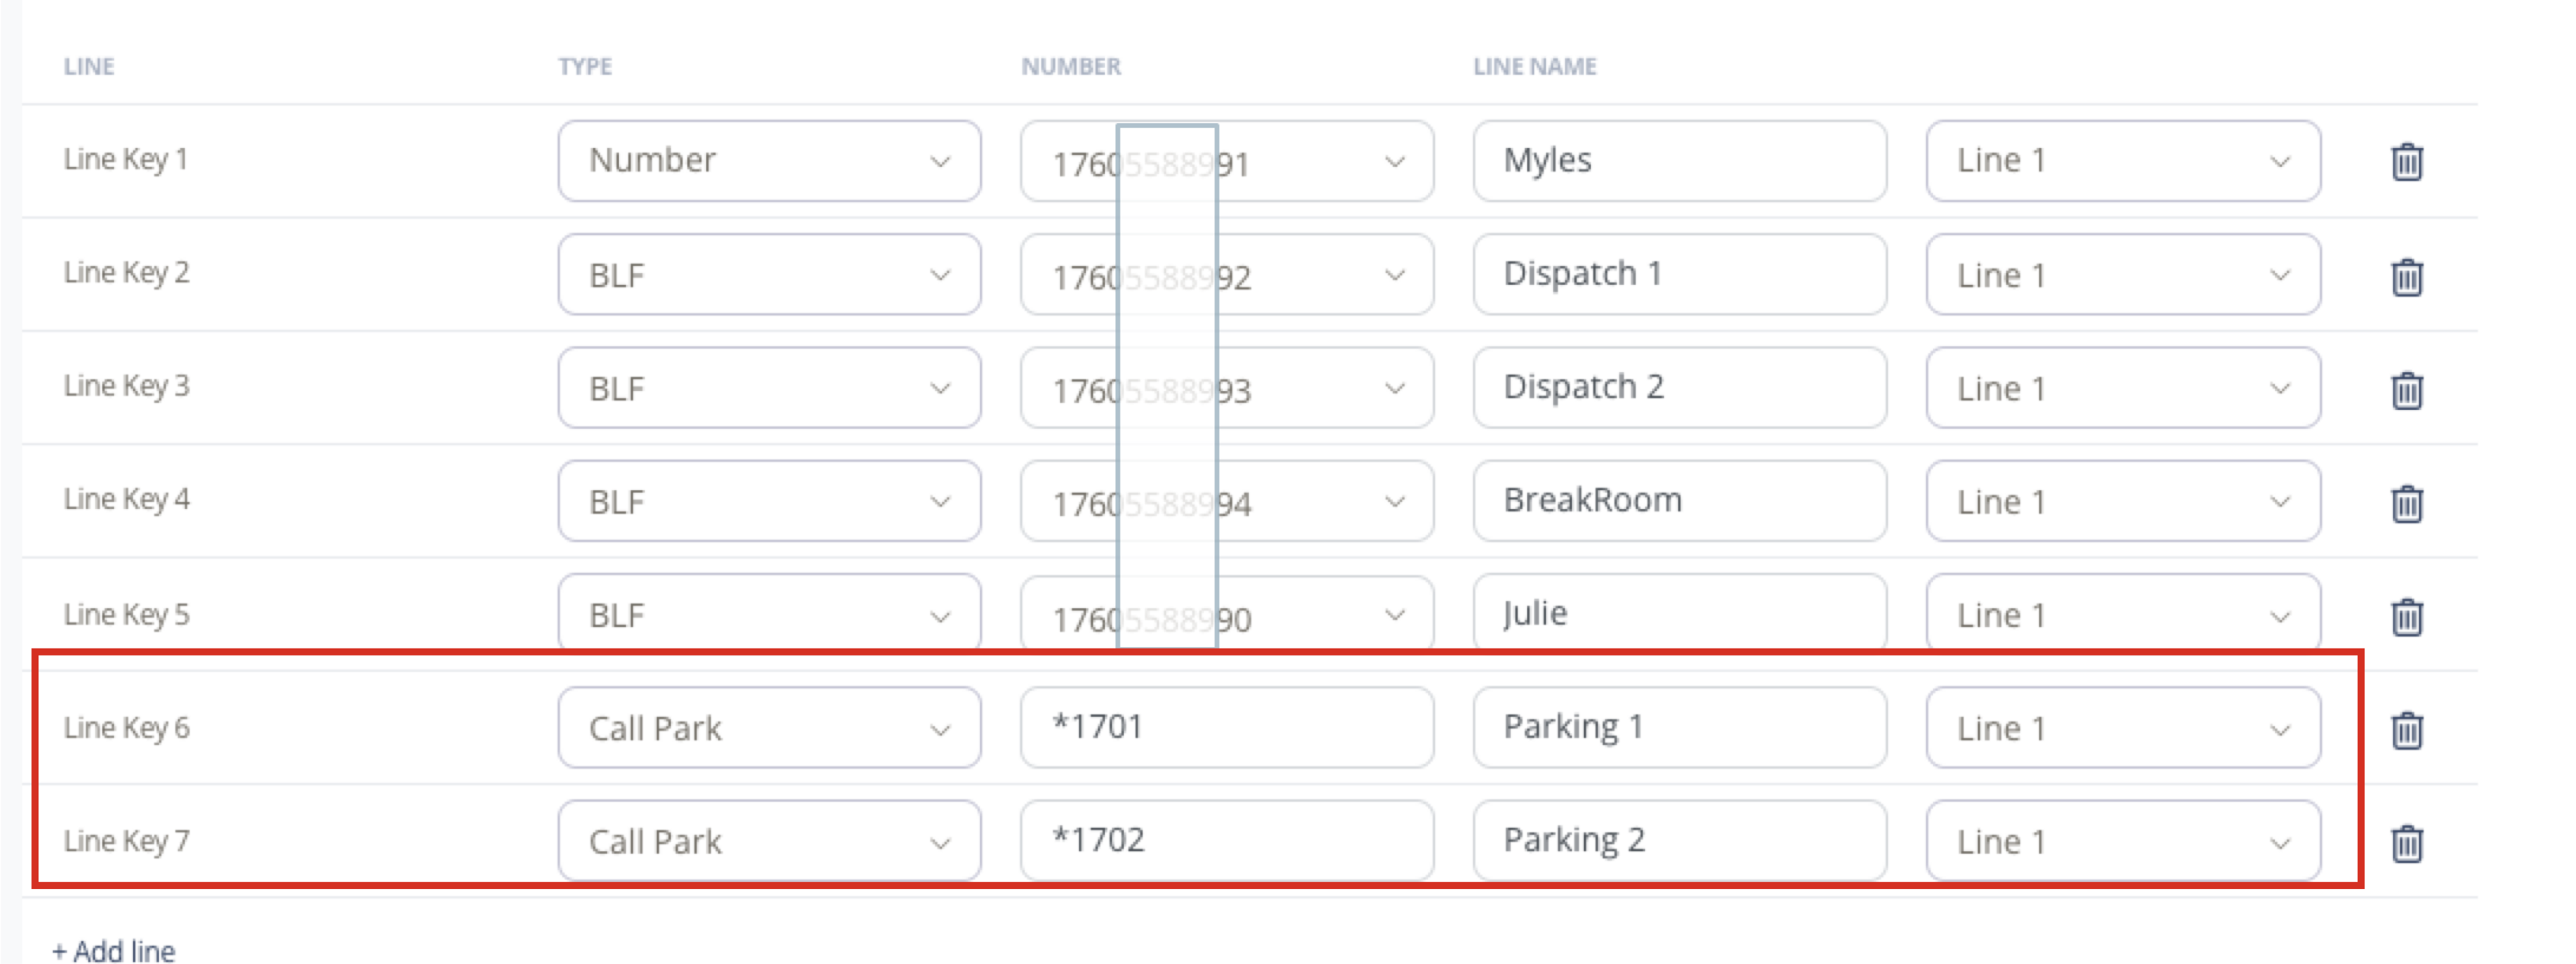
Under Line Keys, select an available line key.
Set Type to Call Park.
Set Number to your parking slot code (for example, *1701 for Parking 1, *1702 for Parking 2).
Enter a Line Name to label the key on the phone (for example, Parking 1).
Click Save. The phone restarts automatically to apply the changes.
To park a call, press the configured Call Park key during an active call. To retrieve it, press the same key from any phone on the account.
1.3 Multicast
Broadcast a live audio announcement to multiple phones simultaneously — useful for office-wide announcements, warehouse calls, or paging across departments.
Under Line Keys, select an available line key.
Set Type to Speed Dial.
Set Number to *46.
Enter a Line Name such as Page All.
Click Save. The phone restarts automatically to apply the changes.
Press the configured key to initiate a page to all phones on the account.
1.4 Bulk Upload
Upload multiple Yealink phones at once using the template spreadsheet.
Click Yealink bulk upload.
Click Download template to download the spreadsheet.
Open the template. In the MAC column, enter each phone’s MAC address. In the Number column, enter the phone number to assign. In the Label column, enter a label for the number.
To assign multiple numbers to one phone, enter additional numbers and labels in the adjacent columns. To add another phone, repeat these steps in a new row.
Save the file.
Click Yealink bulk upload, select Choose File, then click Upload.
Wait for a notification confirming the upload.
Check your email for a provisioning update notification showing successful or failed uploads.
Manually reboot your Yealink phone. After the first reboot, any subsequent changes via Device Provisioning will automatically reboot the phone to apply updates.
1.5 Pair DECT Handsets
Yealink DECT handsets (W52, W56, W70, W76) are compatible with SIPcity device provisioning. However, you must manually pair each handset with its base station — this final step is not automated.
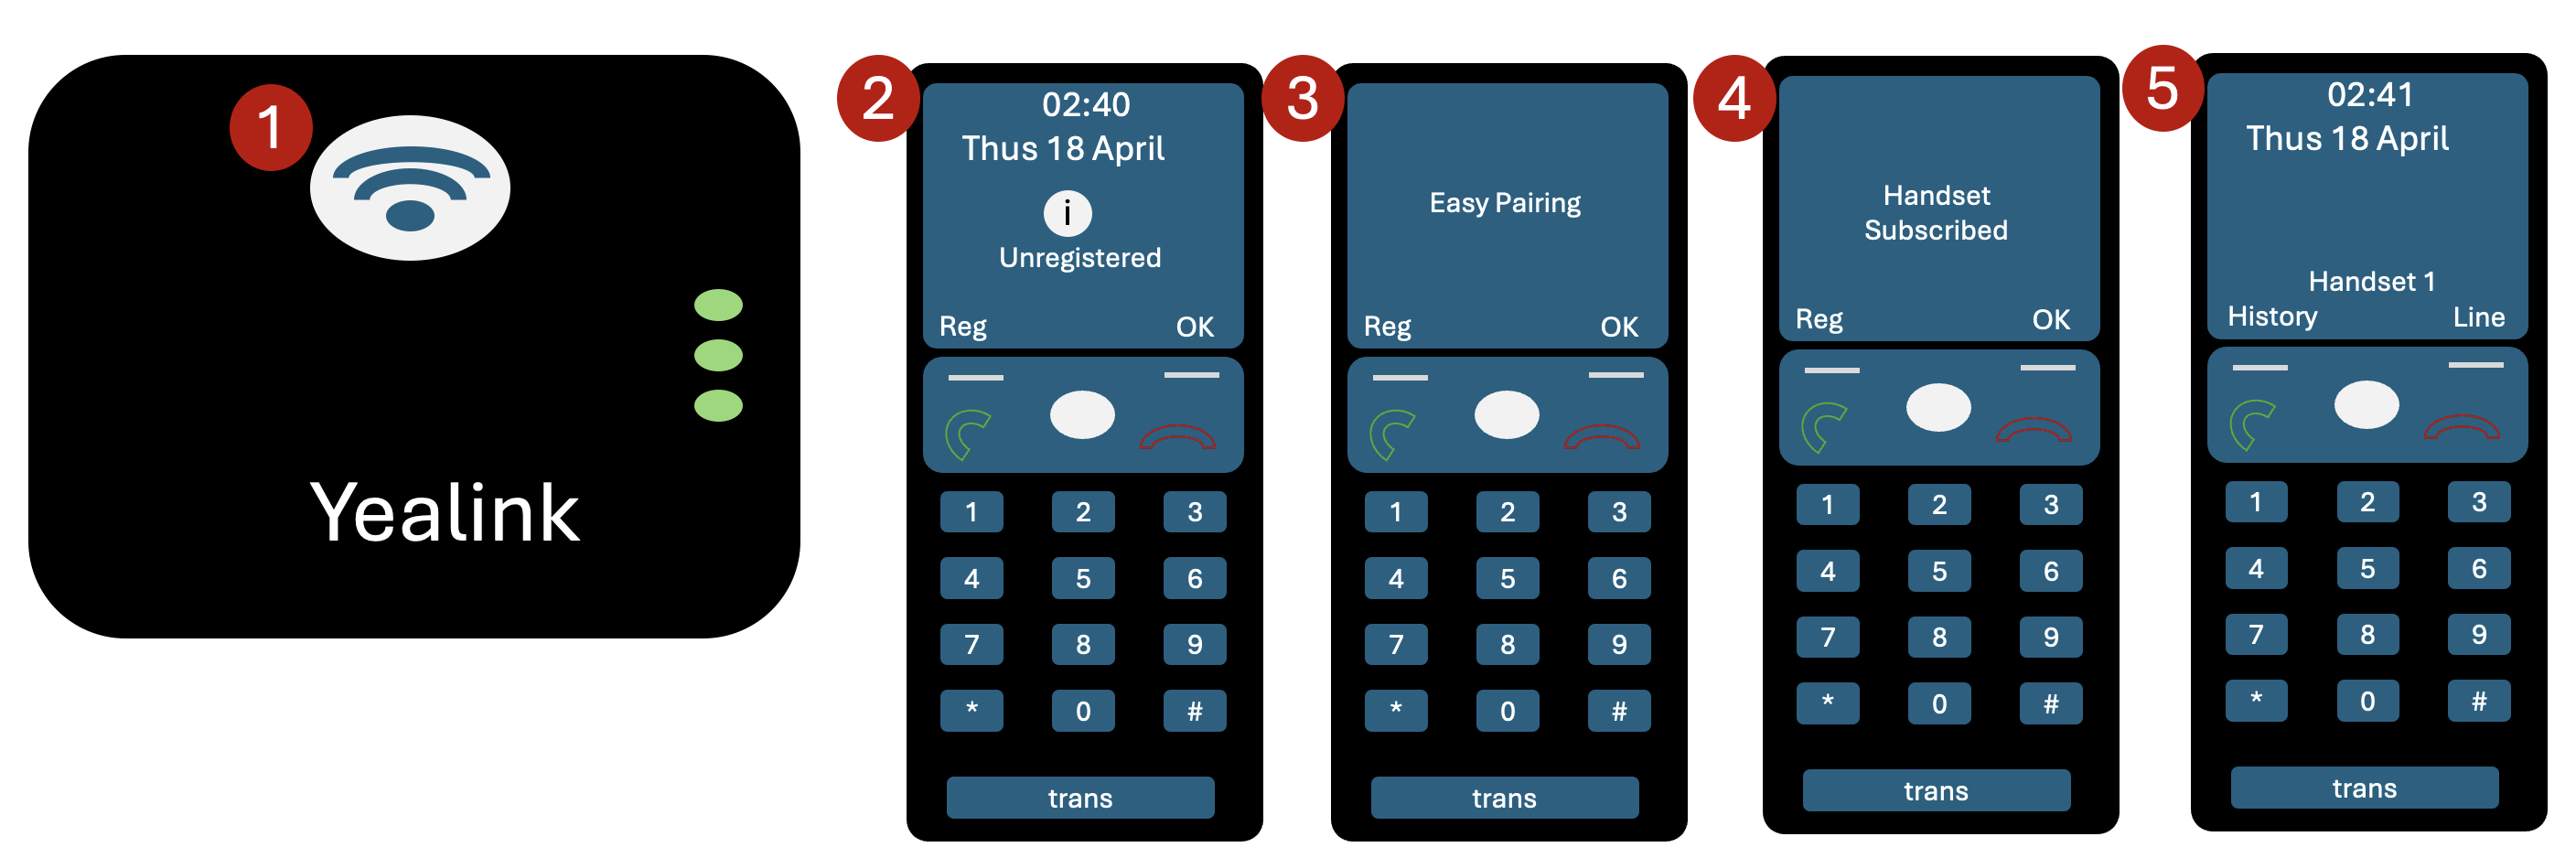
On the base station, press and hold the Pager button.
On the handset, press the Reg key.
On the handset, go to Status > Easy Pairing.
The handset will show Handset Subscribed.
Confirm Handset Registered appears on the handset.
2. Manual Configuration
2.1 Access the Web Interface
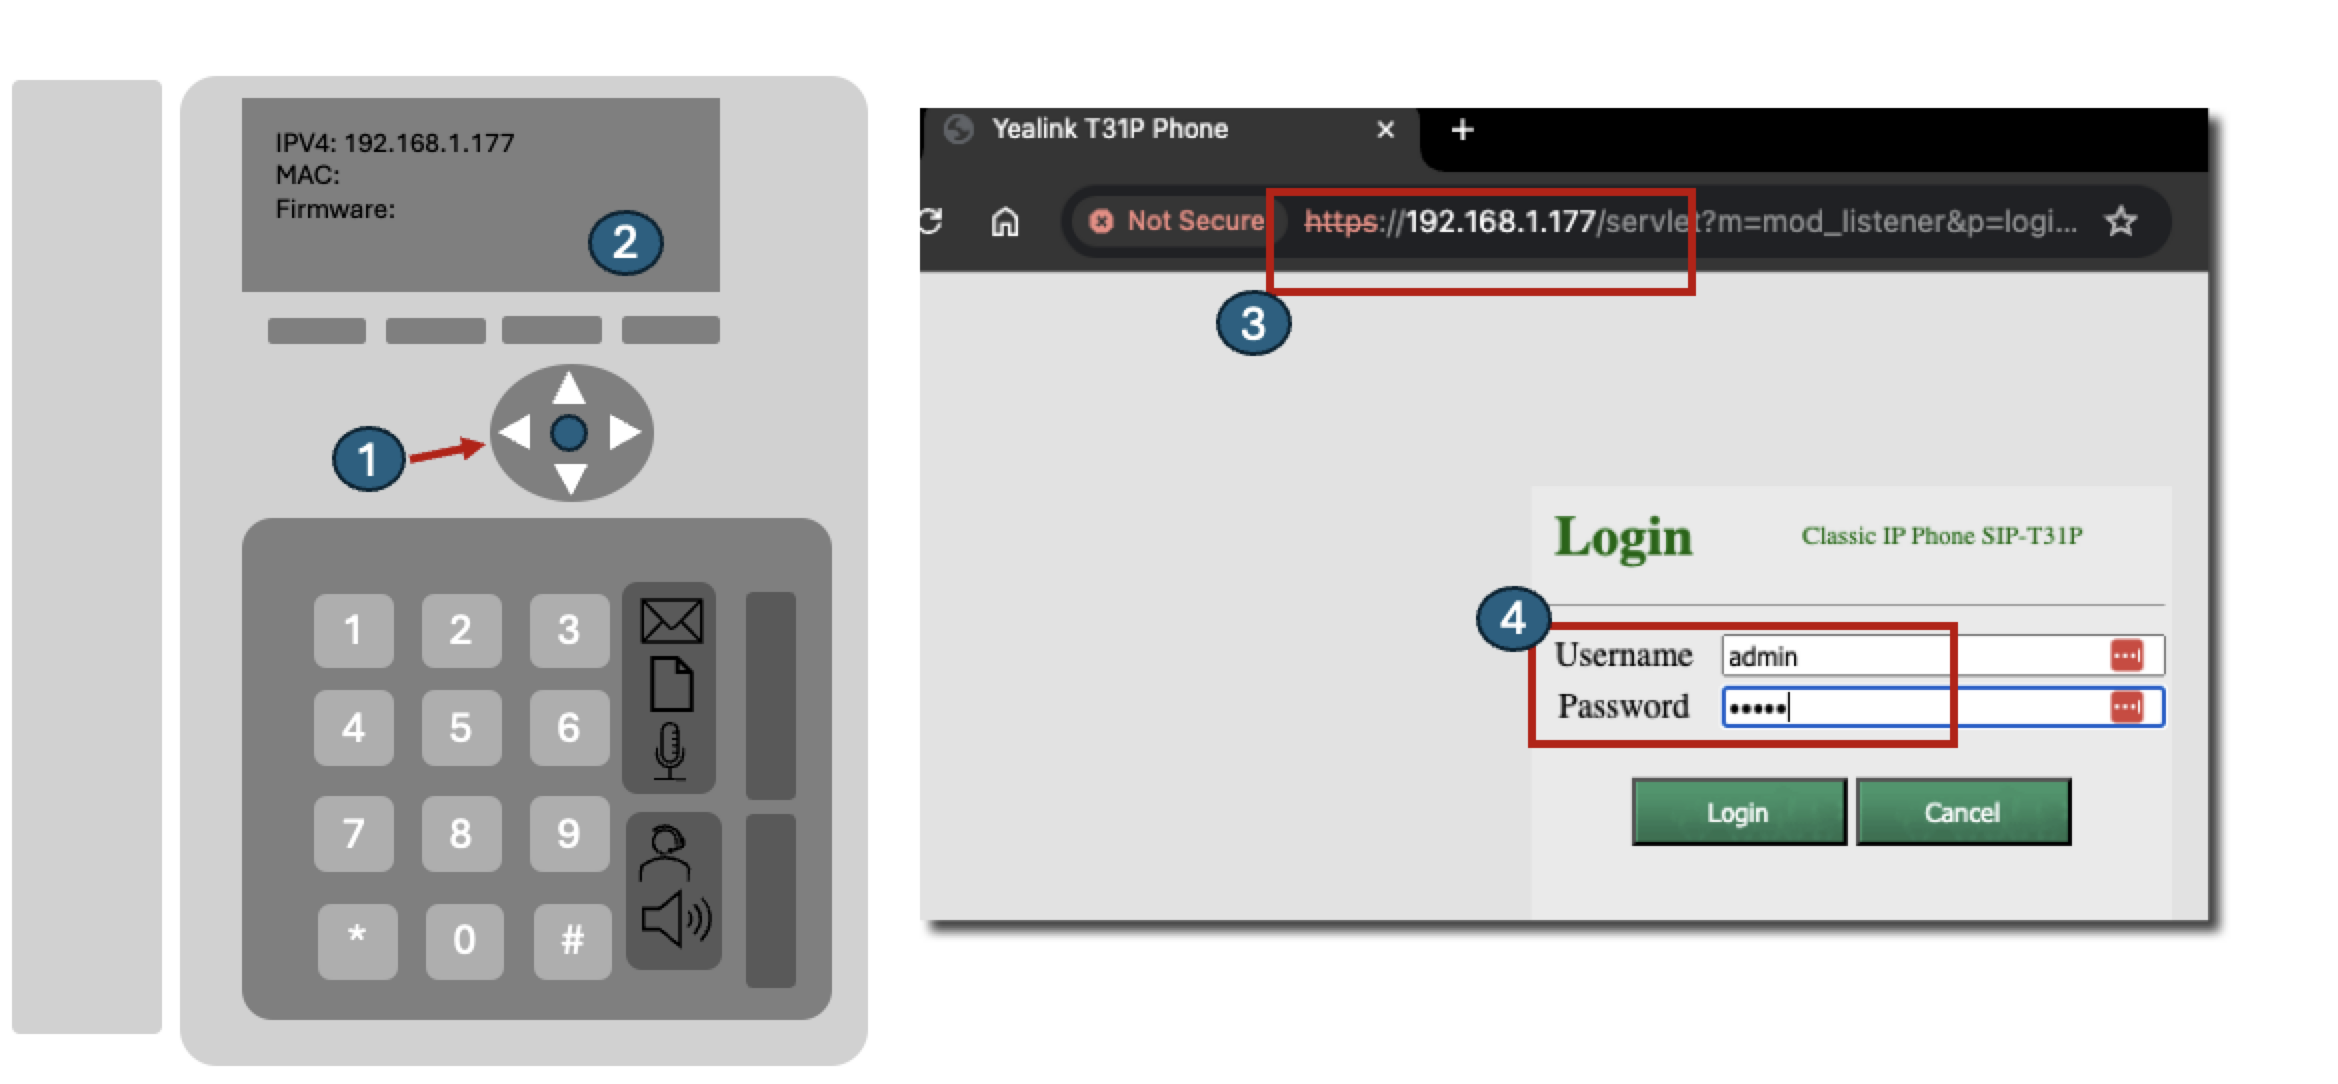
On the Yealink phone, press the OK button (right of keypad) to display the phone’s IP address.
Enter the IP address in your browser (e.g. 192.168.1.xx).
Log in with Username: admin and Password: admin.
Click Confirm.
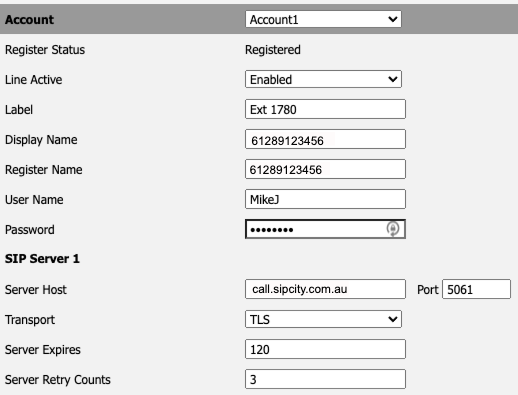
2.2 Configure the Account
Select the Account tab (use an unused account if Account 1 is in use), then set the following fields:
Field
Value
Account Active
Enable
Label
Your name
Display Name
Shown on your phone screen when idle
Register Name
Full DID (e.g. 61289123456)
Username
Full DID (e.g. 61289123456)
Password
Your account password or restricted line password (found in your account’s switchboard)
SIP Server
call.sipcity.com.au
Port
5061
Transport
TLS
Click Confirm to save.
3. Configure Keys and Address Book
3.1 Configure DSS Keys
Each key on your Yealink IP phone can be configured with individual features, including Line, Speed Dial, BLF, Call Park, Call Pickup, and Voicemail.
Access the phone’s web interface (see Section 2.1).
Select Dsskey.
Configure Quick Dials and BLF keys for your handset.
Click Confirm at the bottom of the page to save your settings.
Note: Refer to the manufacturer’s instructions for more information on configuring your specific phone model.
3.2 Manage the Address Book
You can add and manage contacts on your Yealink phone via the DSS tab or by importing contacts using the Directory function.
Use DSS Speed Dials
The DSS (Dedicated Service Switch Keys) allows you to configure speed dials on your handset — up to 27 depending on your phone model.
Use Directory
The Directory function lets you:
Add contacts directly via the phone’s web user interface.
Import contact lists in XML or CSV format.
Connect to your LDAP directory source.
3.3 Presence and Busy Lamp Field (BLF)
Presence or Busy Lamp Field (BLF) shows the availability status of extensions on your account as an LED indicator on your IP phone.
BLF operates via the SIP protocol by sending your phone status messages about other monitored extensions. When any monitored extension changes from idle to busy (or vice versa), the Cloud PBX notifies all subscribed phones via SIP NOTIFY messages, acknowledged with a 200 OK response.
Presence and BLF are automatically enabled on the SIPcity network.
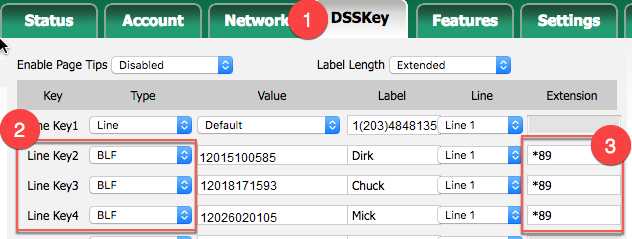
Set up BLF on a Yealink phone
Select the DSSKey tab.
Select the line key you want to monitor.
Set Type to BLF.
Set Value to the phone number you want to monitor. Include the country and area code.
For Directed Group Pickup, set each BLF number’s Extension column to *89.
Click Confirm to save and apply.
LED states
Once configured, the LEDs on your Yealink display the following:
Green — Extension is available. Press the BLF key to dial.
Red — Extension is on a call.
Blinking red — Extension is receiving a call. Press the BLF key to pick up.
3.4 Paging and Multicast
Multicast paging lets you broadcast a live audio announcement to multiple phones simultaneously — useful for office-wide announcements, warehouse calls, or paging across departments.
YouTube Demonstration
3.5 Set Codec Order
Access the Web Interface
Press the OK button on the handset to retrieve the phone’s IP address.
Enter the IP address in your web browser.
Log in with username admin and password admin.
Configure Codec Order
Click the Account tab.
Click Codec in the left menu.
Select Enabled Codecs.
Remove G.722 and G.729.
Reorder codec priority by region.
Click Save.
Reboot if prompted.
4. Connect Hardware Add-ons
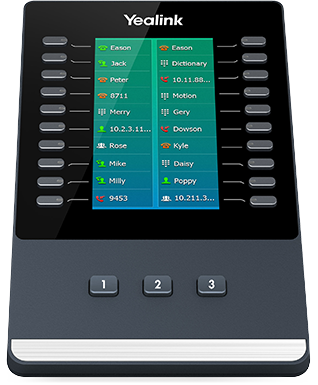
4.1 Connect an Expansion Module (EXP40)
The Yealink EXP40 expansion module is ideal for receptionists and high-volume users.
Connect the extension cable.
Power setup.
Mounting.
Configure DSS keys.
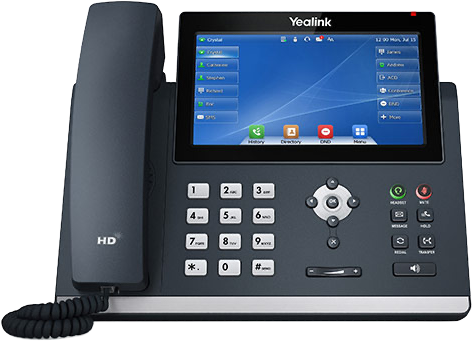
4.2 Connect a Bluetooth Headset (T48G)
Insert the USB dongle.
Power on headset.
Enable pairing.
Scan and connect.
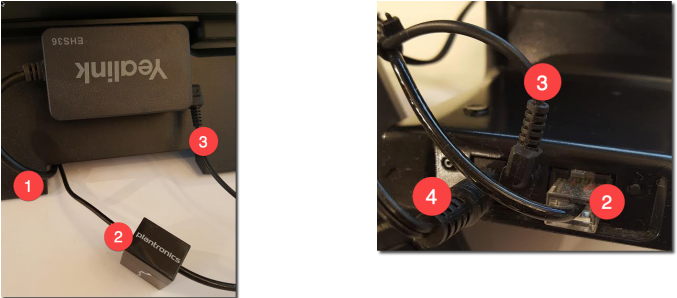
4.3 Electronic Hook Switch (EHS)
Connect extension lead.
Connect headset jack.
Power EHS.
Power base station.
5. Run Phone Diagnostics
5.1 Access the Web Interface
Retrieve IP address.
Open in browser.
Login.
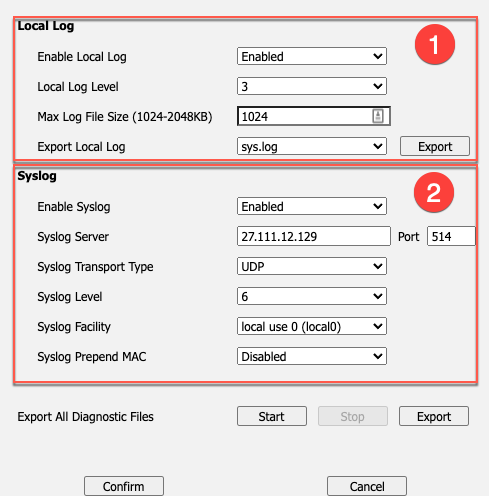
5.2 Export Local Logs
Go to Settings.
Set log level.
Capture PCAP.
Export config.
Email support.
5.3 Enable Syslog
Enable Syslog.
Set server.
Set transport.
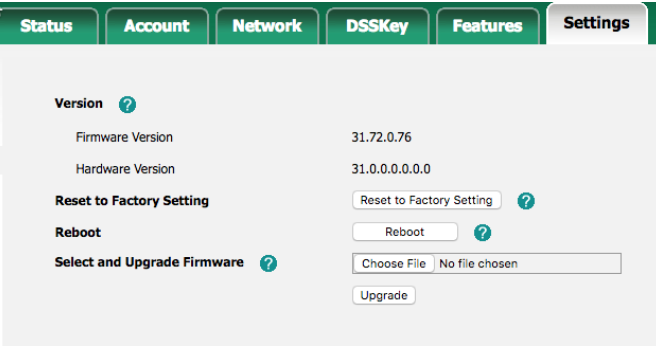
6. Factory Reset and Firmware Upgrade
6.1 Factory Reset the Phone
⚠ Warning: A factory reset will erase all configuration.